Friday 23 May 2014

clay render for end of year show piece

Here is a final render of the poster that I have created for my end of year show. I have added a Clay render to give a good effect to show off my final piece of work for my Dissertation Module.


Bibliography

Pro Optimizer and Optimizer tutorial
http://mycreativedaddy.com/how-to-reduce-polygon-count-in-3ds-max-easily/

Pepakura Files
http://www.therpf.com/f78/blackouts-mark-42-hd-pepakura-files-view-my-helmet-model-interactively-online-185331/
http://www.therpf.com/f78/helagaks-iron-man-mark-42-all-files-released-176505/


Pro-Optimizer and Optimizer tutorial
http://mycreativedaddy.com/how-to-reduce-polygon-count-in-3ds-max-easily/

Xnormals download page
http://www.xnormal.net/Downloads.aspx

Clay render tutorial
https://www.youtube.com/watch?v=lH_rHnlUFBw

Bookmarks for references, tutorials and general researching
https://www.youtube.com/watch?v=ZFSXtjFI9ig - Baking Normal maps in 3ds Max
https://www.youtube.com/watch?v=lH_rHnlUFBw - 3DS MAX Clay Render Tutorial
https://www.youtube.com/watch?v=Z_YIHLcpwMU - xNormal - Baking Normal maps for 3ds Max & Troubleshooting
http://www.3dtotal.com/tutorial/3d_studio_max/fast_ambient_occlusion_mapping/fast_ambient_occlusion_mapping_03.php - Fast Ambient Occlusion tutorial
https://www.youtube.com/watch?v=frPuPNA0daY - Baking normals, AO and more in 3DS MAX (render to texture)
https://www.youtube.com/watch?v=ybiHIUWPZnc - 3DS MAX Normal Map Baking Tutorial
https://www.youtube.com/watch?v=zBW2RQr4fNk - Retopo Workflow between Autodesk Catch 123D, 3ds Max and Mudbox
http://www.videocopilot.net/forum/viewtopic.php?f=20&t=116137 - Mark 42 3D model reference
http://media.cmcdn.net/19884007/780x759.png - Iron man mark 7 reference
http://cgi.tutsplus.com/tutorials/an-introduction-to-subdivision-high-poly-modeling-tools-and-techniques--cg-734 - An introduction to Subdivision (High-poly) Modeling Tools and Techniques
http://3d.about.com/od/3d-101-The-Basics/a/Introduction-To-3d-Modeling-Techniques.htm - 7 Common Modelling Techniques for Films and Games
https://www.youtube.com/watch?v=8VJ60VCQoQE - Zbrush creature sculpting
https://www.youtube.com/watch?v=8VJ60VCQoQE
https://www.youtube.com/watch?v=ZFSXtjFI9ig - Texture Baking Normal Maps n 3DS MAX
https://www.youtube.com/watch?v=A6CtYSw63aE - Simple Normal Mapping Tutorial in 3DS MAX
https://www.youtube.com/watch?v=dQ79bAe7zns - Scultping and modelling in Maya and Mudbox
http://library.creativecow.net/kaufman_debra/VFX_Alessandro-Cioffi_Iron-Man_3/1 - Iron Man 3: The Trixsters Behind Tony Stark's Shiny New Armor
https://www.udemy.com/3dmotive-complete-game-asset-workflow-the-treasure-chest/ - Complete game asset work flow - The Treasure Chest
http://3d.about.com/od/Creating-3D-The-CG-Pipeline/ss/Maya-Lesson-2-2-The-Extrude-Tool_3.htm - Maya Lesson 2.2 - The Extrude tool
http://3d.about.com/od/Career-Resources/tp/5-Common-Pitfalls-Of-Beginning-Modelers.htm - % common pitfalls of Beginning Modellers
https://www.youtube.com/watch?v=frPuPNA0daY - Baking normals, AO and More (Redner to Texture)
https://www.youtube.com/watch?v=7CADg397cf0 - 3dsmax Modelling
https://www.youtube.com/watch?v=_kONIPr_gBM - 3ds max tricks - Edit normals to control smoothing and lighting
https://www.youtube.com/watch?v=pAiHihF9ea8 - High poly robot modelling for games
https://www.youtube.com/user/DigitalTutors?feature=watch - digital tutors
https://www.youtube.com/watch?v=ptjlWuvNzMQ - 3dsmax with Mudbox
https://www.youtube.com/watch?v=bJSrxsBRLQ0 - 3d skull modelling
www.digitaltutors.com/ - 3d modelling tutorials
http://5k3d.blogspot.co.uk/ - Movie models
http://cgi.tutsplus.com/articles/43-mind-bending-mudbox-tuts--cg-1584 - 43 Mudbox mind bending tuts
https://area.autodesk.com/mudcom/showcase/iron-man-3d-by-felipe-fierro - Iron Man 3d
http://mudbox-sin.blogspot.co.uk/2011/05/iron-man.html - Mudbox art by Sin
https://www.youtube.com/watch?v=126YvIpwXHQ - hard surface forms
https://www.youtube.com/watch?v=EIP9L7N5JTE -  Modeling and painting with Mudbox
https://www.youtube.com/watch?v=fFvalXJMh7o - Iron man modelling Training DVD
http://www.turbosquid.com/3d-models/3d-mark-42-patriot-armors/769914 - Mark 42 and Iron Patriot Armour
http://www.turbosquid.com/3d-models/3d-model-mark-17-heart/759521 - Heart breaker armour
http://www.turbosquid.com/3d-models/3ds-max-ironman-mark-iii-armour/625330 - mark 3 armour
http://www.turbosquid.com/3d-models/3ds-max-mark-42-armor/758048 - mark 42 armour http://sgthk.deviantart.com/art/WIP-Iron-Man-Stage-2-94572091 - WIP Iron Man Stage 2
http://www.3dcadbrowser.com/download.aspx?3dmodel=28890 0 Iron Man helmet 3d Model
http://5k3d.blogspot.co.uk/2013/05/iron-man-3-armor-mark-42.html - Iron Man 3 armour - Mark 42

Books 
Franson, David - 2D Artwork and 3D modeling for game artists
Daniele, Tod - Poly-modeling with 3ds Max; thinking outside the box
Murdock, Kelly L. - 3DS MAX 2008 bible


reflection

This post is a simple list of issues that upon reflecting back on the project are what I would have done to achieve a better end result if time was no object and if I had the knowledge I now have from completing this project:


  •  I have established that the biggest flaw in my dissertation has been creating my high poly first instead of my low poly as this has caused most of the issues, but this is personal to myself as others find it easier to model the high poly first so it is dependent on personal experience and I believe I would personally more comfortable and achieve better results modelling this way.

  • I think that if I had created the model all as one object the issue with Mudbox may have not been created as this would have made the poly's and geometry flow better within the model, instead of creating the different aspects of the model separately and adjusting/ adding to the geometry to attach the new parts of the amour whilst attempting to make the geometry flow fluidly. I believe if I did it this way that the poly count could have been even lower as well.


  • If time was no object I would create the low poly first and carry the model across into Mudbox and add the details as originally planned to make the high poly and then try Xnormals again to see if the errors I came across were my own fault or the software. If that didn't work I would use projection mapping again but this time I would ensure that I research thoroughly into more depth about UVW creation and again into more depth with secular maps then finally add texture maps to give the model more aesthetic appeal and reduce the poly count even further, which will aid with all of the previous processes greatly. 
  • I would also have more time to experiment and make mistakes due to creating low poly first.


  • Do not get enticed by the Retopologize tool. 
  • I have learnt not to use the Turbo Smooth modifier and if I have to use any sort of smoothing, I should use Smoothing groups instead, but if I can, I should create the geometry so that smoothing isn't needed.
  • I have learnt not to use optimizer or pro-optimizer modifiers, unless it is for a last resort and not for this sort of work as it was near impossible to use for baking as my normal maps weren't created when I used it. I found this out the hard way as I mentioned previously due to the poly's being reduced but not uniformly which wasted a lot of time that could have been spent on my UVW creation/ research and adding more details into the model, normal and specular maps.  
  • If is was to do this again I would have modeled the low poly better to aid in getting better results when modifying the cage when projection mapping.

Final render of submitted work

Here is my final renders of the Low, Normal mapped and High poly models in one file ready for my submission.

Low, Normal and High poly Models.
I haven't added any special lighting or effects to this render to show my models in their entirety, to show the work that I have put into this project. On a side note I have made the high poly more detailed with the geometry on the mask, shoulders and chest purely to show the detail that could potentially cover the whole suit, again if time was no object.  Ideally I know a lot of these details would be added using texturing but I wanted to zone in and focus my work on the baking side and leave out the texturing, so the high poly count is mostly due to this, and this aspect isn't as focused to the industry standard but I wanted to test mine and the abilities of normal maps as well as having a good high quality piece to show at our end of year show.

Final Render of High poly model
 Here is my final render of my high poly model using a simple Clay render in Max that gives it a really nice finish and brings out the lights and shadows of the geometry. This wouldn't work as well on the lower poly models as clay renders affect the geometry more so than the normal maps.

I followed this simple tutorial to achieve the clay render look above
https://www.youtube.com/watch?v=lH_rHnlUFBw

Normal and Specular Maps

This is a simple, short ans sweat post explaining briefly normal and specular maps relationships and how i used them in my model.

From this point in the project my time has been spent making the model look as good and high quality as possible. I was suggested again to add a specular map as well as the normal map to enhance the shadows and best parts of the model as specular and normal maps work hand in hand with each other and promote each other greatly.

Due to time and lack of knowledge again I only done some basic research and established that I didn't have enough time or knowledge to create a brilliant, out of this world, specular map, so instead I applied a simple white texture in the specular map slot to enhance the lighting of the whole model instead of specific areas. Ideally I would use the normal maps to produce a black and white texture that is specific to the normal map and this would then brighten the light areas and darken the shadowed areas, but time is very much against me now.

xnormals and Projection Mapping

Once I had finished my low poly model to a standard I was happy with I then moved forward to creating my Normal maps.

Xnormals
My first port of call was Xnormals. Similar to a lot of my work on this project I have never used this software before and it was suggested to me at the start of the year by another student on my course. I have jumped in at the deep end with this project as I have attempted and experimented with a lot of different pieces of software that I haven't used before and I have gained a lot of knowledge and experience in doing so.

Instead of me explaining a step by step guide on how I used Xnormals I will simply direct you to the link below as I followed this tutorial to the letter. Unfortunately however this didn't work for me as the normal map didn't render at first and when I eventually got it to render after a lot of tinkering with settings and UVW Map creations it didn't work. Again see below the normal map that was produced with Xnormals and you can see that this would not have worked on mine or any model.

Xnormals Tutorial
https://www.youtube.com/watch?v=kGszEIT4Kww

Xnormals Normal Map


After many attempts to create a working normal map on my low poly, optimized and pro optimized models I established that this wasn't going to work as the same results kept appearing. So I then moved on to Projection Mapping.


Projection Mapping
This method seemed difficult and didn't work at first, like Xnormals, but after some tinkering with the settings and ensuring that the program used the existing Chanel mapping coordinates that I set and made and not the automatic flatten mapping that occurs when the wrong check box is ticked, I started to get some promising results.

However the results from the Optimized and Pro-Optimized low poly models didn't work very well at all. So then, through process of elimination, I had established that my UVW Template was better than the one that the program made itself, even though it was very basic and simply modified (moved lower jaw section from bottom of the model to its own space on the map). I had also established that the best method for this particular model was Projection mapping, with all of the points mentioned in previous posts about if time was no object and what I would do differently if I was to do this again, i'm sure that Xnormals and the other techniques that I attempted would have worked if I didn't attempt a quicker method of doing the initial modelling in the first place.

I now have a great basis to learn more from in the future. My normal's may have took a while to actually create using the different techniques, different software and my lack of experience with this but in the end I have generated the normal map and baked it onto a low poly model that was based on a high poly model which is what I set out to do way back at the start of the year. It may admittedly not be a brilliant and highly detailed model but as I mentioned, if time was no object and I was to do this again the out come would be different as I have learnt from my mistakes and I now know what to and not to do when creating normal's, UVW Maps and baking them.

Below is my Final Normal Map from projection mapping and an earlier version of the result of rendering to texture, which is the key part of projection mapping as this then becomes the normal map. You can see that I had been previously spacing the UVW's as I was suggested to, but genuinely forgot to do so on the one render that worked the best. I believe this render worked the best because I spent a lot of time within the projection mapping settings ensuring that the 'Cage' which is generated from this technique was as precise and close to the high poly model as possible and I tweaked the low poly so that it had enough faces in the right places to project better. i.e. the helmet, chest piece and shoulders. Again if I had more time I could have done this better and would remember to space out my UV's at the start of EVERY process.

Final Projection Normal Map


Earlier Render to Texture


Finally a combination of the two of these images would have been a close to perfect normal map as they are evenly spaced and show a lot of detail.

uvw unwrapping

UVW unwrapping is my most weakest point and is fundamental to good normal map creation. When it came to unwrapping my models I applied a simple unwrap in the UVW editor called Box Mapping (I did this on all of my experimentation and tests with Optimizer and Pro-Optimizer throughout the project) and in doing so I think that this is the main reason for why my models normal maps do not look as good as they potentially could.

As Xnormals creates the normal maps and Unwraps the UV's for you I was most keen to use this method of generating my normal maps as I knew that this side of the modelling process is my weakest point. (i will talk more about Xnormals in future posts)

This has been a great learning curve and I know now what to and not to do in the future when normal mapping and to plan a lot of time during production for the unwrapping of the UV's. Below is my simple UVW template that I used once I had fully completed my low poly model to a standard I was happy with.

UVW Template

If I was to do this again I again would have spent more time on the unwrapping and researched more into how to create a better UVW Unwrap. I also would have spaced the map out better as suggested to me by my module tutor, which I was doing with earlier unwraps when trying out different techniques but at this point I had completely forgot to do so and ironically this was the best resulting UVW Unwrap of them all so I left it as it was so I didn't spoil the end result.

Again if time was no object I would have spent more time on this and researched into more detail about how to generate better UVW templates and will be giving myself more time for Unwrapping on projects in the future.
Final Low Poly Model


Optimizer and Pro Optimizer

Whilst I was modelling the lower poly version, I decided to have a quick research into similar methods to the retopologize tool in Mudbox 2014 but within 3DSMAX instead. In doing so I came across two tools, called Optimizer and Pro Optimizer. So I quickly saved my work and experimented with using these new tools. These tools simply calculate the Polys in your current model and convert that amount into a percentage and then you simply reduce the vertex percentage to your desired amount or simply type in the amount of vertices you want the new model to be.

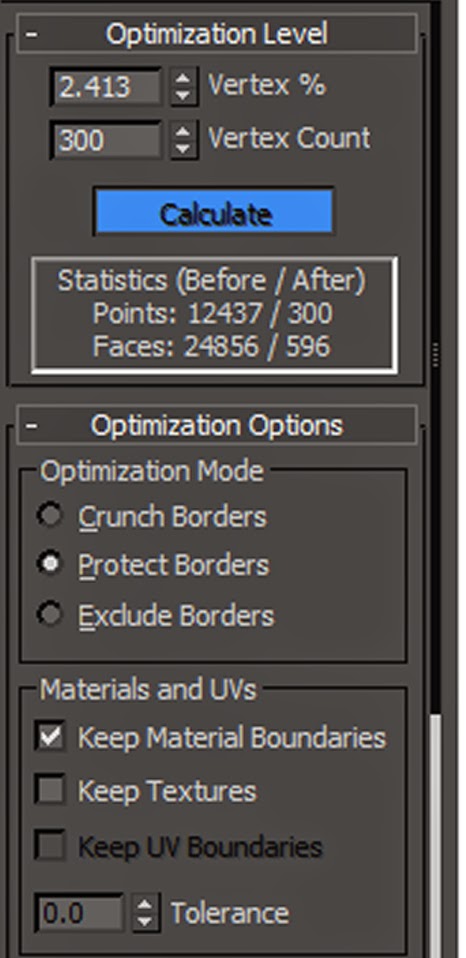
I made a copy of my high poly model and reduced the vertices to around 300-500 roughly to experiment with the resulting low poly model.

In doing so I found that the result was a very rough and badly flowing low poly model. But to fully test the aspects of these new tools I then proceeded to the normal map creation side of the modelling process.Bad idea. Because the new models weren't uniformly scaled and just generally not very good, Xnormals took ages to render and didn't even produce a normal map and the Projection Mapping process was so long and difficult due to the above again, that I had to revert back again and carry on with the original method, as the normal map produced wasn't recognizable and definitely not usable. This wasted a lot of my time unfortunately, as I hoped it was going to be a quick test and it turned out to be a lot more difficult than I presumed earlier on and wasted a lot of time as I had played around with settings a lot and still couldn't get it to work.

This also gave me an insight to the Retopologize tool in Mudbox 2014, if the extremely similar tool present in 3DS MAX didn't work for me and I am more used to Max and the software's interface compared to Mudbox, then I may have perhaps bitten off more than I could chew when I planned to use Mudbox's Retopologize tool to create the lower poly model from the high as the issue that I came across in Max would have potentially occurred within Mudbox and I do not have as good a knowledge as I do with Max so I wouldn't have been able to fix it.

So if I had been a bit too relaxed at the point in my model creation when I attempted to use the retopologize tool in Mudbox and left it later on in the year I would have been stuck so I am very proud of myself that I stuck to my timeline plan so that I could resolve most of the issues that I came across.

After this I then carried on creating my low poly model from the high poly within Max.

Bibliography
http://mycreativedaddy.com/how-to-reduce-polygon-count-in-3ds-max-easily/


Low Poly Creation

Now I am making the low poly from high which isn't perfect but due to time constraints and every other method I have tried not working I have no choice but to continue this way.

I created the low poly in Max and only used Max from this point onwards. I still would say I have learned a lot with Mudbox as at the start of the year I knew nothing about the software but, through my research, I now know the basics and some extra uses of the software that I can take forward in future endeavors.
I believe that if I had created the model all as one object the issue with the Retopologize tool not working in Mudbox may have not arose as this would have made the poly's and geometry flow better within the model. Instead of creating the different parts of the model separately and adjusting/ adding to the geometry to attach the new parts of the amour whilst attempting to make the geometry flow, I should have done it this way. I believe if I did it this way that the poly count could have been even lower as well, again improving the outcome of the model and my turn around time.

To create my low poly from the high poly I followed a similar process to the methods I used to make the original bust. As well as all of my other references and guides I had already to create my model I also had the other advantage of having my high poly in the scene as well.

I made the high poly transparent so that I could start my low poly ever so slightly inside the original bust, as the low poly needs to be as close to the original as possible but not be larger than the original. So a lot of time was taken ensuring that I made the model to the best of my ability, as low poly as possible and as close to the high poly size as I possibly could. See below my low poly being created inside the high poly using the high poly and the planes as a guide. The chest is slightly to big but was reduced at a later date.


I later had to add more detail for the Projection mapping to work better as well as to tweak the chest but the low poly model that I created is at the very top end of what an in game character model would normally be, poly count wise. This is due to needing to add more detail to the model to make the normal map work better and project more of the original bust. I will cover this in more detail in my up coming posts.


Here is my high and low poly together. I have put auto smooth on all of the smoothing groups for the high poly and 1 smoothing group for the low poly ready for mapping.


Here is the low poly without any smoothing groups. The model isn't perfect but I was pushed for time and the model does what it is required to do. The model was tweaked and changed as I went along so this isn't the final end result but is close.


If I was to create the low poly first as I originally intended to I believe that the issues that arose from creating my low poly afterwards wouldn't have surfaced as I would have created the high from the low instead. I have established that the biggest flaw in my dissertation has been creating my high poly first instead of my low poly as this has caused most of the issues. But this was due partly to my research into Mudbox and the Retopologize tool, so I have learnt the hard way not to use this tool as it doesn't work as I want it to and has given myself more unnecessary work and issues to overcome, but I have learnt from this and I now know, that for me personally it is best to create the low poly first and then the high poly from it and DON'T touch the Retopologize tool.

Mudbox

I have been focusing all of my attention over the last few months to ensure that my model will be ready for my dissertation submission, hence my lack of blog updates over this time period.

Once my high poly model had been created I proceeded to follow the tutorials and guides (See Different Methods of Retopology post or link below) to create my low poly model from my high poly within Mudbox. As I said at the start of the year I have never used Mudbox before this module, So I am completely reliant on the tutorials and guides that I can find online.

https://www.youtube.com/watch?v=zBW2RQr4fNk

I have experimented with Mudbox earlier on in the year, and my research influenced my original decision to use the above method, but when I imported my model into Mudbox the model had errors, which due to my inexperience with the software I was unsure how to fix and because of these errors I was unable to create my low poly model via the Retopologize tool. At this point I was very close to the end of the modelling phase of my project timeline. So, I took it upon myself to further change my plan of action and back tracked to my original plan of using a high poly and a low poly and then use the program Xnormals to create my normal maps, then Bake my final end result, but instead of using Mudbox I decided to use 3DS MAX as I am most comfortable with this software and my time frame was rapidly decreasing.

Pepakura Files

As I mentioned in the previous post I have been using the Video Pilot website as well as my reference planes for guidance when compiling my model.

As well as these, if I came across any majorly difficult aspects of the model that I couldn't quite get my head around for example the armpit and detail work on the helmet or I couldn't view parts correctly I moved to another method of guidance in the form of Pepakura files. Pepakura files are user made models designed for physical prop creation, for use at comic con and other such cosplay events. Because of this, they are not 100% perfect/ accurate for 3D Model creation in Max as they are designed to take into consideration the spacing of the materials used to create the life size suit, so these files were a last resort because of this.

The software interface, Pepakura Viewer/Designer, allows the user to view the files as flattened separate pieces, intended for printing the costume out, as well as view and manipulate the model in a 3D window. The flattened image wasn't as useful as the 3D window but altogether I found this piece of software very handy in times of need.

Here is an example of some of the files that I used during the creation process sourced from the Replica Prop Forum.


Bibliography:
http://www.therpf.com/f78/blackouts-mark-42-hd-pepakura-files-view-my-helmet-model-interactively-online-185331/
http://www.therpf.com/f78/helagaks-iron-man-mark-42-all-files-released-176505/

VideoPilot Iron Man Model

Following my last post I decided to model my higher poly model first and then import the model into Mudbox 2014 and use a new tool which was released within it to lower the topology to create my lower poly version ready for baking, called Retopologize.

During the creation process of my high poly model I used the planar modelling technique whilst using the following link as a constant reference as well as my reference image below split onto two reference planes to make the model to the best of my ability.


http://www.videocopilot.net/forum/viewtopic.php?f=20&t=116137

I found this link very useful as it shows a lot of step by step, high detail images of the users creation process of his high poly iron man model and was a great help when modelling all aspects of the model.

Here are several images showing the start, middle and end results of my high poly creation using the above link and images as references.

As mentioned above here is my initial set up and how I started my modelling process. I firstly modeled the chest piece, then i moved onto the back, shoulders, head and then finally the neck. For quickness I also used the symmetry modifier to speed up the modelling time and because, thankfully,  this model is completely symmetrical down the centre of the model on the Y axis.


At this point I had decided that I wasn't going to add the arms on to the model as the deadline was rapidly approaching and I was coming across difficulties with the modelling process that were unexpected, such as finding references for the under arm area. As the main focus of my dissertation is the baking process however I believe this slight change to not be a big issue as I can still achieve my goals with this modelling change.


As I was modelling I had been using Turbosmooth as my main method of smoothing and after some research into lowering the poly count and with some helpful tips from classmates I decided to remove the turbo smooth and add a simple auto smooth with the polygon faces selected using smoothing groups within max. In doing so I reduced the poly count from 80,000 polys to 12,000. I was very happy with this as it reduced the amount back to my original planed amount for in game assets.


Here is the end result with no smoothing on the model at all  and below is the model with a simple auto smooth applied via the smoothing groups.


At this Point I was ready to import my model into Mudbox 2014 and start following the tutorials and guides I found online to generate my low poly model from my high poly version. Again this is a slight deviation from my original plan but I believe was a necessary decision as it would show me around new software and new tools to better my modelling skills in the future.


Bibliography:
http://www.videocopilot.net/forum/viewtopic.php?f=20&t=116137
http://www.ironmanwallpaper.com

Friday 11 April 2014

Different Methods of Retopology

As I have been progressing through my final year and compiling my work I have been struggling with the methods of retopology and how many different ways there are of achieving the same goal using the two pieces of software. Below are a few videos I have found and i have decided to show you them as they are the better retopology techniques I have found. The second video is also the technique I have decided I am going to use as I am not 100% sure on how to use the mudbox software and I am more confident with 3dsmax. This combined with the rapidly decreasing time frame left to complete this project I believe would help me greatly whilst still achieving the goal I set myself at the start of the year. Also I believe that finding the quickest and easiest technique for myself whilst still achieving my goal is also good practice as potential employers could see I have tried different techniques and found one that works with me. I believe finding the easiest and quickest technique for the individual person, to achieve your goal is a great thing, as long as the quality doesn't diminish. As you are completing your work quickly and efficiently, this gives you the ability to move onto other tasks quicker.

https://www.youtube.com/watch?v=ybiHIUWPZnc - this is just a quick short a sweat example of what can be done using baking on a simple ball model and giving it the appearance of a dent using the higher poly as a material, all within in 3dsmax. This video also explains everything you need to no with a step by step walk through on how to bake the models using projection mapping from start to end product.

https://www.youtube.com/watch?v=zBW2RQr4fNk - within this video we are shown a different technique to create lower poly models from higher poly models using a retopology tool within mudbox. This video also shows a step by step walk through from exporting the model from 3dsmax into mudbox to the final end product. This technique is great for retopologizing but not great for animation as the user has no control over the deformations and the lower poly models topology. However,  this technique would be suited to my specific model as it is not being animated but would not be suited for in game moving models or characters, but could be used for decorative pieces in game as to not strain the game engine. As I mentioned earlier for the purpose of my model i will use this technique as i am familiar with the tools and useability of 3dsmax and can add final details with mudbox, which will mean i can utilize some of the techniques I have researched, then utilize the retopologize tool, giving me the lower poly model from my higher poly model instead of my original plan of making a low poly as well as a high poly model. This technique is also adhering to my plan as I stated I wanted to make my model as close to the industry standard practices as possible which I believe for a decorative game piece this would be adhering to the industry practices and standards.

https://www.youtube.com/watch?v=frPuPNA0daY - this final video for this post is a very high quality look at normal mapping, baking normals and much, much more information on a lot of other aspects of retopology and other useful techniques. These aspects of modelling I am not confident with so will be a great help combined with the other videos I have found as he goes into a lot of detail and walks the viewer from start to finish again, much like the videos above but in more detail and explains many techniques within 3dsmax whereas the above videos are more single technique specific.

I hope you like this post and more will follow soon.

Wednesday 26 March 2014

Experimentation

Over the last few weeks I have been heavily thinking about my model and how I am going to complete it on time and to a good enough standard. Here is a quick post to show some of the experimentation I have been doing with modelling techniques in 3dsmax.

I will be using some, if not all of my findings below when compiling my final model as some components are easier to model than others.

Following this I will be posting some of the findings of my additional topology research and the different ways I have found to achieve my overall modelling goal.


As I mentioned earlier these were some quick experiments to see what techniques would work best for me on the difficult parts of the model that I was worrying about. These techniques combined with my earlier work I believe will help me greatly in finishing my model on time and to a good level of detail.

Thursday 20 February 2014

Progress

This post is just to show the progress I have made since my Presentation until now. As I mentioned earlier I have been focusing the majority of my time on my other modules as the submission where before this submission.


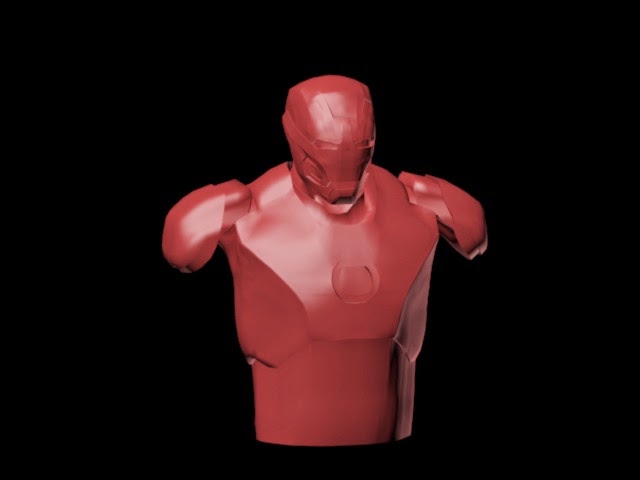
I have focused mainly on improving from where I left off and neatened and tidied the geometry and shape of the chest.


I Know it doesn't look like I have done that much to it but it is a lot trickier than it looks. I want to make sure that the shape I make is correct as I go along so I don't have to go back and make corrections. This is why I have been using turbosmooth throughout to check how the geometry looks and flows.

I am now at a difficult pat of the suit where the schematic I'm following doesn't cover the part I'm modelling (Under the arm pit). As well as this I am also at the point where I am moving from the front of the model to the back and I need to ensure that I match the front and back perfectly, as well as not editing both sides at the same time. That is another reason why it looks like less work has been done as I was accidentally moving the front of the model out of place when I was modelling the back and had to delete it and start from the beginning again.


This is just a small update, hope you like it

Work Update / Presentation Feedback / Poly Count Research

Hello all,

It has been a while since I have posted and that is due to prioritising my time on my other modules as they were due to be handed in. Now they are handed in I am going to be devoting a lot more of my time to this project.

I have been recently looking up the poly count for main character poly counts as I was unsure on how low.high detail i should make my first model in Max to adhere to industry standards.

Through this site http://www.polycount.com/forum/showthread.php?t=96804 I found the answer to my questions. I am going to make my model around 50000 polys or slightly more as I am only doing a bust, as according to this site this is the rough industry standard for main character models. After this I will then be exporting into Mudbox and applying more detail and creating my Normal map from this model.

Also since my last post I have been working on my Model in Max and I also presented my work to my tutors.The general feedback I received from them was that my model is on track and my plans look achievable which I am very happy about. Following my presentation I have now added these following things onto my research to do list, from my tutors and class mates as I have been informed that these could help me greatly :

-Xnormals
-Ocular Occlusion
- How I plan to unwrap the UVW's

I will be posting a comparison of my first attempt and my current attempt at modelling Iron Man soon when I have got my low poly to a standard I am happy with.

Dan


Bibliography:
http://www.polycount.com/forum/showthread.php?t=96804