From all of my research I have discovered that there are a lot of different names and methods of doing what I want to do for my final project (Hence the title of this post).
I have also found that there are a lot of different names for the same thing but here is, just to clarify in the simplest terms possible, what I will be doing over the next few months:
Firstly I will be/am experimenting with 3ds Max and Mudbox to find which techniques best suit me and to learn how to use Mudbox correctly as well as learning new techniques within the Mudbox software as well.
Once I have decided on my technique that I wish to model my suit with, I will then start modelling it. I have decided that I am going to model different segments of the suit separately, which will help me greatly with the normal mapping and UVW Unwrapping process as well as giving me options on what part I can work on encase I get stuck on a certain part of the geometry for example, and I can then carry on modelling on other sections.
After this, when my low poly model is complete in Max, I will Unwrap the UVW's of the model ready for Mapping. Then, once the unwrap is complete I will export the model into Mudbox and add further, high quality details to it, damage, scuffs, edges etc.
Then I will move back into Max and Bake the High Poly UV's from Mudbox onto the Low Poly model from 3ds Max using Normal Maps to give the illusion of a higher quality model, thus adhering to industry practises when modelling in game characters and speeding up rendering time.
Lastly, while I am modelling if I encounter a problem or start to have great difficulty with completing the full suit I may decide, as a last resort, to change my model from a full suit to a Bust of the suit if my time frame starts to rapidly deplete. As I say this is a last resort and want to complete the full suit as it will be a very challenging and rewarding model for me to complete.
Wednesday, 18 December 2013
Normal Mapping
As I have been looking through my research I have found that I have forgotten a few techniques which will be useful, if not a necessity, for my dissertation project to be completed.
The main technique that I need to brush my skills up on is Normal Mapping/Projection Mapping.
This is just a short and sweet post to show my memory recap research that I have found to jog my memory on how to do Normal Mapping/Projection Mapping.
The first place I looked for help was YouTube as there are hundreds of different help guides and tutorials on there to help me re learn what I need. Below are two very helpful short videos which helped me rekindle my knowledge of the very basics of Normal Mapping/Projection Mapping and Baking.
http://www.youtube.com/watch?v=ybiHIUWPZnc -
http://www.youtube.com/watch?v=A6CtYSw63aE - Simple normal mapping tutorial in 3Ds Max, Dries
Once I watched these videos and a few others I then moved on to '3ds Max 2008' by Kelly L. Murdock. This book and others has been a key reference and font of knowledge when I come across modelling difficulties. Within this book there is a whole chapter devoted to Normal Mapping and Baking High Poly models onto Low Poly Models. Encase you do not know what Normal Mapping and Baking is below is an extract that explains this technique or 'efficiency trick' as they put it.
"Normal maps calculate the lighting results used to light small details that stick out from the surface of an object. These details are then recreated using a normal map that is applied back onto a simplified version of the object. The normal map allows these details to be simulated without the extra polygons used to create them. By allowing simple base objects to have details such as bolts and rivets without the extra polygons, the objects can be redrawn quickly without losing visual quality."
There is a lot of information within this book that explains in great detail on how to complete a Normal Map from start to finish, which I have found very helpful.
Thanks to the sources above I believe that I have started to rekindle my knowledge and more of Normal Mapping and Baking.
Thursday, 21 November 2013
Deformation Research
As I mentioned
previously I am going to be conducting some further research into the aspects
of 3D Modelling that I find quite difficult and that was suggested to me by my
tutor to look into due to my under estimation of how long it would take to do
in my proposal.
Upon my research into Deformation I came across a very useful website that helped me understand a lot more about my modelling and future models that I wish to make through a simple, 5 points of common pitfalls of beginning modellers. This also helped me understand the basics of deformation and has given me a lot more information to carry on researching into.
Here is some
useful information on the five most common pitfalls for beginner Modellers or
Modellers trying something different and new techniques:
1. Too Ambitious, Too Soon
“It's
tempting to aim for the stars right out of the gate, but there's a reason you
see dozens of variations on the following quote so often on popular CG forums:
“This is an image I've had in my head for years, but I've been waiting for my
technical skills to catch up.”
CG is
hard, it's technical and complex. When you're planning your projects ask
yourself, “what are the technical hurdles I might run into, and can I
realistically solve them at this time?” If the answer is yes, go for it!
However, if a prospective project will require you to try hair, fluid, global
illumination, and render passes for the first time ever, it's probably smarter
to study each of those concepts individually before you try to combine them in
an image. Challenge yourself, but try to know when your ambition is getting the
better of you.
Uncertainty, more than anything else, is what leads to
abandoned projects, and in my opinion a bad image is still better than an
unfinished one.”
2.
Ignoring Topology
“Topology
and edge flow are incredibly important for character models that are meant for
animation. For static game-meshes, and environment models, edge flow is less
important, but that doesn't mean it should be ignored entirely.
Model in quads (four sided polygons) as often as possible, especially if
you plan on taking a model into Zbrush or Mudbox for sculpting later on. Quads
are ideal because they can be subdivided (for sculpting) or triangulated (for
game-engines) very smoothly and and easily.
Topology is a vast topic, and going into detail here would be
impossible. Just keep some of the basics in mind while you work:
·
Avoid N-gons (5-sided polygons or greater).
·
Keep triangles to a relative minimum.
·
Try to have evenly spaced subdivisions, and avoid elongated faces. Your
polygons don't have to be perfectly square, but keep them as close as you can
within reason.
·
For an animated mesh, add extra edge loops wherever there will be
deformation (elbows, knees, lips, etc.).
·
Remember to clean up a topology artefacts after using Maya's bevel tool
(which often creates triangles and occasionally n-gons.
·
If you smooth your model and notice “pinching” try to think about how
you can re-route edges so that your mesh smooths more favourably.
·
If you notice non-manifold geometry, stop what you're doing and fix
it immediately.”
If you're not sure what non-manifold geometry
is, I will be researching and posting about this shortly.
3. Too Many Subdivisions
“Subdividing
your mesh too early in the modelling process will only cause pain and regret,
and often contributes to the “lumpy” or irregular quality seen in a lot of
novice work.
As a rule of thumb, don't add resolution until you're sure you've nailed
the shape and silhouette with the polygons you already have.”
4. Always Modelling Seamless Meshes
“It's a
common misconception among beginning modellers that a finished model needs to
be a single seamless mesh. This isn't the case at all, and trying to model
things that way will only make your life more difficult.
I remember watching a 3DMotive training series awhile back and the
instructor offered a good way to think about the question of whether an element
of your model should be seamless, or separate geometry; think about the way the
model you're building would be constructed in the real world, and model it as
close to that as possible.
Designers always say that form follows function, and that statement
holds some weight here—if you run into a situation where you think it'll be
easier to model something in two pieces, do it.
Now having said that, there are two exceptions to this—3d printing, and
game art.
With game art, it's often preferable for the final asset to be a
seamless mesh; however the final game model is usually a retopologized version
of a high resolution mesh.” This is what I will be doing with my
model.
5. Not Using Image Planes
“I know
this one well, because I used to try to eyeball stuff all the time, or jump
directly into Maya without considering design and composition, thinking “oh
I'll design it as I model it.”
I've gradually developed a habit of carrying around a little 5 by 7 pad
of grid paper, and when I'm not doing anything I'll pull out a page and sketch
out orthographic ideas for buildings and environment assets. I throw away twice
as many as I save, but if I like one I'll stick it up on some cork board above
my monitor so that it's there if I ever need it. If I decide one of them fits
into a project, I'll make a scan and pull it into Maya as an image plane.
Not only does it allow me to work faster, it allows me to work more
accurately, and accuracy is one of the keys to efficiency. I now use image
planes for every major asset that I model, especially characters or complex
architectural pieces, and my work is much better for it.
And this counts double (or even triple) if you're shooting for
photorealism!”
I believe
that all of the above are extremely relevant for me as I have never taken on a
model of this scale or difficulty before. I have also never used Mudbox before
so the research here has helped me to ensure that I do not make simple mistakes
when creating my model.
A key point
I have learned here is about adding extra edge loops wherever there will be
deformation as I have never been shown how to take deformation into account
when modelling before, so this has aided me greatly. Even though my model won’t
be animated at this time, I would still have to take animation into account
while modelling, as if I was working in the industry, character modelling would
be split into different sections of the production i.e. modellers and
animators. This is a good practise to get into as when working in a group it is
essential that the team works well together and understands wheat needs doing
on each model and group to save each other time fixing un needed modelling and
animation issues.
Bibliography:
http://3d.about.com/od/Career-Resources/tp/5-Common-Pitfalls-Of-Beginning-Modelers.htm
Bibliography:
http://3d.about.com/od/Career-Resources/tp/5-Common-Pitfalls-Of-Beginning-Modelers.htm
Proposal Assessment
Overall I am happy with the response and grade that
I received for my Proposal and I am now on my way to start the creation of my
Iron Man model.
The only issue that was raised was that I may have
sightly underestimated the time it will take to accurately unwrap the UV's for
this model in preparation for normal mapping, and also to prepare the mesh
for clean deformation.
I will be looking into these areas more
specifically before I start modelling. I will also look further into
this when it is nearer the time of completing these stages of the project.
Below you can see my adjusted timeline taking the
above into account.

If need be I will be making adjustments again as
I progress in making my model but I will be conducting more
research into this area as well as discussing with my tutors
beforehand. This is also my weaker aspect of the modelling process so I will be
learning a lot upon completing my Dissertation Module.
Thursday, 31 October 2013
Useful website for 3D Modellers
Within my research for learning new techniques, skills and
practices within the 3D Modelling industry I came across a website called
www.digitaltutors.com. I believe this website could potentially be very useful
as it has many, many hours of different and useful modelling techniques hints
and tips which are easy to understand and follow.
This will be a great help for me personally as I have never used
the Mudbox software before and this will show me a lot of hints, tips and
tricks that I can try out and apply to my model at the later stages of my
Dissertation.
This website also has a lot of help with modelling within Max as
well, so again, I can use this site for help with my modelling technique
research, as well as assistance with my modelling. I am also not very efficient
with my Unwrapping and Mapping skills in Max and this is where I believe I am
going to have the most difficulty within this process, even compared to learning
the new modelling software, as for some reason, I find it a very difficult part
of the modelling process. Luckily for me however, this website is very well
stocked with information and resources on this and many other aspects of 3D
Modelling.
The only downside to this website is that there is a fee to use
their services, but for the amount of information that is displayed and can be
taught to you in such a short space of time I think this website will be a very
good, investment for any 3D Modeller who needs to learn new skills within the
industry and not just for myself. The pricing is $45 a month, which for me I
can use this site in the last month or two of my modelling process which is
where I believe I will need the most help and will potentially get the best
results possible using this and the many other websites and resources I have
found.
I have specifically written about this site however because it
impressed me with how much is displayed for the price you pay and the potential
of how much you can learn from it. I thought that it could also be very useful
for anyone else out there looking to do 3D Modelling, whether you are just
starting up, need to refresh your memory and learn new techniques and tricks or
even if you are experienced in Modelling already, and of course, to help the
many other students out there doing there Dissertation on 3D Modelling.
Final Dissertation Proposal
After conducting many more hours of research and after discussing with my tutors I have now completed my Dissertation Proposal and handed it in.
This is a quick overview of what I am now going to be undertaking over the next academic year within the Dissertation Module.
I am going to be carrying on my research into 3D Modelling techniques and testing and playing with them until I find some that I like. Once I have found these I will be starting my modelling process. I still haven't decided yet whether I will be creating the model as a whole piece or as individual pieces and compile them together once all of the parts are completed. I will be deciding this when experimenting with the different techniques I find as different aspects of the armour appear to be more difficult to model than others so may be more beneficial for me to model them separately with different techniques as this may speed up my modelling time. If however I find a modelling technique that will work well with all aspects of the model I will make the model as a whole suit instead of the previous modelling method. I will be making my higher poly version of the model at around 10-15k polys as this appears to be the average poly count for higher end in game models.
After completing this stage I will be Unwrapping the UVW's of the completed model in 3ds Max, then export them into Mudbox and will be adjusting and tweaking the model to give it neater edges and more detail to give the appearance of a higher quality model than the physical model that was made in Max. Once I am happy with the details I have added to the Mudbox model I will then export it and Bake it onto the lower quality model as a Normal Map to give it the desired effect and usability within a game engine.
This is a very popular method of high quality character modelling as this gives a model the appearance of being a much higher quality than they really are, meaning less stress is put on the game engine when running the model. This will also give me a lot of information and techniques to research within Mudbox as well as showing me a lot of the capabilities and uses of Mudbox. Upon completing my dissertation I will have hopefully learned a lot of new skills within both pieces of software and this will also greatly help with employability and my portfolio for the future.
Friday, 25 October 2013
Mudbox Research
As I have done a lot of research into 3D modelling for my Iron Man model I have found that the most useful and best tool to use to create my model is 3ds Max. Following the research I have found, I have also looked into other 3D modelling tools to use, I was also suggested by my tutor to look into and possibly use Mudbox along with 3ds Max.
Below are some of the links to videos I found giving examples of the work that can be done with Mudbox as well as simple tutorials on how to use the basics and more advanced tools within the software.
Videos:
http://www.youtube.com/watch?v=126YvIpwXHQ - Hard Surface Forms
http://www.youtube.com/watch?v=EIP9L7N5JTE - Modelling and Painting in Mudbox
http://www.youtube.com/watch?v=HGwXOC2ham4 - Introduction to Character Modelling using Mudbox and Maya
Artwork examples:
Iron man:


Bio Suit:


Deadpool:


From the links above you can see that Mudbox is more suited for organic models as it is more of a sculpting tool. I could still use Mudbox to create a 'Hard Surface Form' but as I already have some knowledge in Max and time is precious, I think I will be more beneficial doing the whole model in Max instead of using both. I will discuss this with my tutors first before committing to a decision as I believe that using Mudbox for my dissertation is not necessary as my model is a rigid model and the desired look I wish to create can be made using 3ds Max alone and creating rigid models in Mudbox looks far more complex and time consuming.
If am to complete my model using just 3ds Max this would give me the opportunity to develop my skills a lot further than if I was to learn how to use Mudbox and apply what I have learnt in Mudbox to my model. I believe that using Mudbox after modelling in Max would be useful for future, organic models but would potentially be useless or time wasting for the model that I wish to create now. As I mentioned earlier before I completely rule out using Mudbox I will be discussing this issue further with my tutor to ensure I am making the right decision before proceeding with my dissertation.
I have also included a link in my bibliography to a website which give many different tutorials which may be useful if I decide to use Mudbox in the future as well as for others who wish to learn some useful tools and tips in Mudbox.
Bibliography:
Videos:
http://www.youtube.com/watch?v=126YvIpwXHQ - Hard Surface Forms
http://www.youtube.com/watch?v=EIP9L7N5JTE - Modelling and Painting in Mudbox
http://www.youtube.com/watch?v=HGwXOC2ham4 - Introduction to Character Modelling using Mudbox and Maya
Images:
https://area.autodesk.com/mudcom/showcase/iron-man-3d-by-felipe-fierro -Iron Man model (textured)
http://mudbox-sin.blogspot.co.uk/2011/05/iron-man.html - Iron man bust model (not finished, non textured)
http://mudbox-sin.blogspot.co.uk/2011/05/bio-suit-mark-2.html - bio suit full model
http://mudbox-sin.blogspot.co.uk/2011/05/deadpool.html - Deadpool bust
Tutorials:
http://cg.tutsplus.com/articles/web-roundups/43-mind-bending-mudbox-tuts/
Below are some of the links to videos I found giving examples of the work that can be done with Mudbox as well as simple tutorials on how to use the basics and more advanced tools within the software.
Videos:
http://www.youtube.com/watch?v=126YvIpwXHQ - Hard Surface Forms
http://www.youtube.com/watch?v=EIP9L7N5JTE - Modelling and Painting in Mudbox
http://www.youtube.com/watch?v=HGwXOC2ham4 - Introduction to Character Modelling using Mudbox and Maya
Artwork examples:
Iron man:
Bio Suit:
Deadpool:
From the links above you can see that Mudbox is more suited for organic models as it is more of a sculpting tool. I could still use Mudbox to create a 'Hard Surface Form' but as I already have some knowledge in Max and time is precious, I think I will be more beneficial doing the whole model in Max instead of using both. I will discuss this with my tutors first before committing to a decision as I believe that using Mudbox for my dissertation is not necessary as my model is a rigid model and the desired look I wish to create can be made using 3ds Max alone and creating rigid models in Mudbox looks far more complex and time consuming.
If am to complete my model using just 3ds Max this would give me the opportunity to develop my skills a lot further than if I was to learn how to use Mudbox and apply what I have learnt in Mudbox to my model. I believe that using Mudbox after modelling in Max would be useful for future, organic models but would potentially be useless or time wasting for the model that I wish to create now. As I mentioned earlier before I completely rule out using Mudbox I will be discussing this issue further with my tutor to ensure I am making the right decision before proceeding with my dissertation.
I have also included a link in my bibliography to a website which give many different tutorials which may be useful if I decide to use Mudbox in the future as well as for others who wish to learn some useful tools and tips in Mudbox.
Bibliography:
Videos:
http://www.youtube.com/watch?v=126YvIpwXHQ - Hard Surface Forms
http://www.youtube.com/watch?v=EIP9L7N5JTE - Modelling and Painting in Mudbox
http://www.youtube.com/watch?v=HGwXOC2ham4 - Introduction to Character Modelling using Mudbox and Maya
Images:
https://area.autodesk.com/mudcom/showcase/iron-man-3d-by-felipe-fierro -Iron Man model (textured)
http://mudbox-sin.blogspot.co.uk/2011/05/iron-man.html - Iron man bust model (not finished, non textured)
http://mudbox-sin.blogspot.co.uk/2011/05/bio-suit-mark-2.html - bio suit full model
http://mudbox-sin.blogspot.co.uk/2011/05/deadpool.html - Deadpool bust
Tutorials:
http://cg.tutsplus.com/articles/web-roundups/43-mind-bending-mudbox-tuts/
Friday, 18 October 2013
Research of Iron man 3D Models
Here is a small post showing some of the research I have looked into on modelling Iron Man in 3DS MAX.
The information I have found can be used as a guide as well as for help as there are a few tutorial videos showing me how to create different parts of the suit, of which I can apply to other parts and/or the whole suit at a later date. These also give me a chance to play with and experiment with different techniques in 3DS MAX.
Tutorials:
Helmet Tutorials:-
http://www.youtube.com/watch?v=0fklceLbWqs - part 1
http://www.youtube.com/watch?v=2Dy6rLRGwFE - part 2
http://www.youtube.com/watch?v=gdhzvY-WcZ0 - part 3
http://www.youtube.com/watch?v=mt2Vfkt455Q - part 4
http://www.youtube.com/watch?v=FYD95f8FrVg - part 5
http://www.youtube.com/watch?v=P9z3Y_K7o_I - part 6
http://www.youtube.com/watch?v=_mvXKkJzzC0 - part 7 (Texturing) will not be texturing my model but is still relevant
Guides and/or examples of 3D Models:
http://www.henrythejedi.com/index.php/i-am-iron-man-volume-1-modelling
http://www.youtube.com/watch?v=0jctqLIfK-w
http://www.youtube.com/watch?v=hEuFv5oJx4c
http://www.youtube.com/watch?v=vK130qZUD8Q
http://www.youtube.com/watch?v=hbV8Y9JIHZ8
http://www.youtube.com/watch?v=jmcHf-LK6ao
http://www.youtube.com/watch?v=1ZbOxSoKEEI
http://www.youtube.com/watch?v=qwwpKst0xew
http://www.youtube.com/watch?v=bhs0d6hVBN8
Speed modelling:
http://www.youtube.com/watch?v=lRAHIg-GrKE
Skinning:
Here is also a simple skinning tutorial that I found. I am not going to be skinning or rigging my model but I thought this was relevant to the work I will be undertaking. As I will need to take into consideration the geometry and topology of my model to allow for movement, animating and rigging. If I was working in the industry the modelling and animating would be done by different parts of the production team so need to make sure that I can do this skill well.
http://www.youtube.com/watch?v=y9-y1bJjoWo
As well as the many YouTube videos above I am also making my way through these books (see bibliography) as well and will be posting my findings from them as well as my development and experimenting with the tutorials above.
Bibliography:
2D Artwork and 3D Modelling for Game Artists - David Franson
3ds Max 2008 - Kelly L. Murdock
Poly-Modelling with 3ds Max - Todd Daniele
Short and Sweet Job Advertisement and Requirements
As suggested to me by a fellow student on my course, I was told to look up adverts so that I would get an idea at what potential employers would e looking for from me and my work in the future.
As I am doing a 3D Modelling Dissertation my main point of interest was 3D Modelling jobs in the games industry. I came across a few adverts that were suited to me and I will be structuring my work around the specific constraints of the job advert that I found most appealing as well as the general constraints of other advertisements that I found that had very similar attributes that they were looking for i.e. knowledge in 3DS Max, Maya, Mud Box etc.
Here is the advert link that I found most appealing and one that I believe I could apply for in the future after completing the course as I display some of the attributes they are looking for and hopefully once I have completed this module I will be able to demonstrate even more of the requirements they are looking for.
http://jobview.monster.co.uk/AAA-UK-Console-Studio-Seeks-Junior-Graduate-3d-Artists-Job-London-London-UK-124840169.aspx?WT.mc_n=Indeed_UK&from=indeed
Here are the requirements that are listed on a job advert from G3D Limited. From this I can see what I need to focus on with my work to ensure that I have the best possible chance to get into the field I want to work in, in the future. Some aspects I believe I may already have but this gives me the opportunity to develop my skills and hopefully acquire the skills I don't have yet.
Requirements:
Strong Portfolio with examples of:
The candidate will ideally have the following qualities:
Here is another job application I found which also will help me focus on what I need to learn and develop to aid me getting a job in the future.
http://www.cwjobs.co.uk/JobSearch/JobDetails.aspx?JobId=57768123
Essential Skills:
As I am doing a 3D Modelling Dissertation my main point of interest was 3D Modelling jobs in the games industry. I came across a few adverts that were suited to me and I will be structuring my work around the specific constraints of the job advert that I found most appealing as well as the general constraints of other advertisements that I found that had very similar attributes that they were looking for i.e. knowledge in 3DS Max, Maya, Mud Box etc.
Here is the advert link that I found most appealing and one that I believe I could apply for in the future after completing the course as I display some of the attributes they are looking for and hopefully once I have completed this module I will be able to demonstrate even more of the requirements they are looking for.
http://jobview.monster.co.uk/AAA-UK-Console-Studio-Seeks-Junior-Graduate-3d-Artists-Job-London-London-UK-124840169.aspx?WT.mc_n=Indeed_UK&from=indeed
Here are the requirements that are listed on a job advert from G3D Limited. From this I can see what I need to focus on with my work to ensure that I have the best possible chance to get into the field I want to work in, in the future. Some aspects I believe I may already have but this gives me the opportunity to develop my skills and hopefully acquire the skills I don't have yet.
Requirements:
Strong Portfolio with examples of:
- Low and High-resolution modelling in 3ds Max (preferred)
- High quality texture creation
- Normal mapped game assets
- Photoshop at good level
- Preferably Z-brush / Mudbox experience
The candidate will ideally have the following qualities:
- Strong communication skills.
- Unreal Engine experience.
- Good eye for details.
- Able to work as part of a team.
- Be a keen gamer
Here is another job application I found which also will help me focus on what I need to learn and develop to aid me getting a job in the future.
http://www.cwjobs.co.uk/JobSearch/JobDetails.aspx?JobId=57768123
Essential Skills:
- Experience of management
- Solid understanding of CG / Modelling Production Pipelines
- Experience using either 3DS Max, Maya, Rhino, Photoshop, V-Ray
- Can do attitude
- Interest in the 3D Industry
- Python
- MAXScript
- Catia V5
Friday, 11 October 2013
Initial Ideas for my Dissertation
Throughout the summer I have been putting a lot of thought about what I should do for my dissertation as I want to challenge myself as well as create something that will be beneficial for me in the future when compiling my portfolio for when I am searching for jobs or roles in the industry I wish to pursue.
I quickly came to the conclusion that I want to pursue a career in the 3D modelling industry whether that be for games, films or TV. From this I then had to decide what I wanted to do and what could be done in the time frame given as well as challenge me.
My initial idea was to model a high quality version of my car and fully texture and animate it to make it look like my car was driving down a road and perhaps transforming into another vehicle or a transformers style robot, if I had time to do so. This would be very challenging for me as just the model alone would take up a lot if not all of my time frame let alone the texturing, rigging and animating side of the project. This idea was scrapped after talking with fellow students on my course as the time frame and lack of knowledge in rigging and animating would make this too difficult for me to learn and produce a high quality end result in the given time.
As many of you may know reading this, I am a big fan of the Marvel Comics Company and particularly the character Iron Man as I have included Marvel or Iron Man in some of my work over the last two years. So I thought I would carry on the tradition and try to incorporate one of them into my third year. I decided in the end to use Iron Man again as this would be a challenging model for me to complete.
My initial idea with Iron Man was to model, texture, rig and animate, similar to the above with my car idea, a full suit if the characters armour. But after discussing with my tutors and with some research into the time frame and difficulty of modelling something like this with so much detail and depth whilst taking into account the geometry for the characters movement, I decided to only model the full suit or bust. If I was working in the industry the modelling, rigging, texturing and animating would be done by different people or teams and I was encouraged to focus on one of them and not all as this would be more beneficial for me as it is better to be very good at one aspect instead of OK at many different parts of the creation process. As I am working on my own and not in a team it will still challenge my abilities and teach me new techniques and skills in the process whilst being relevant and demanding a lot of time and research.
Research:
I briefly looked into examples of previous Iron Man models and the time, patience and ability needed to create a high quality end product. As well as looking at the above and example tutorials on the internet on creating a Iron Man model I will also be researching how to create tidy geometry in my models as well as experimenting on different methods/techniques of creating the model and different software and what the software can and can't do. I will also be delving into how to create models to be ready to handed over to animation/rigging teams and how to have my model ready to go, for example taking into account the characters movement i.e. moving arms and legs whilst keeping the geometry tidy and free from deformations and warping.
Software and learning outcomes:
The software I was initially planning to use was Autodesk 3D Studio Max as I already have some knowledge on this software and how to use it. This software is also very highly used in most industries, whether that be games, film, TV, etc. so it will be great to show to potential, future employers what I can create using this software and I will be learning/trying out different techniques to see what style suits me best and I can work well with and apply to some, if not all, of my model as well as give myself greater knowledge of Max and a challenge in the creation process.
Again, after discussing with my tutors I was advised to research into using the MudBox software as, again, this is highly used in the industry, can do things easier/better than Max can, will be great to show to future employers and will broaden my knowledge with different software.
The model will be created initially in Max then imported into MudBox to add further details and sculpt the model until I am happy with the final result. This will also be challenging and developing my skills as I have yet to use MudBox but having knowledge in using more than one 3D modelling software is not going to be any disadvantage to me in the future. I will ensure that I have given my self enough time in the allotted time frame given to develop, learn and make mistakes using Max and MudBox as these, I believe are key pieces of software to learn how to use properly and I want my end result to be the highest quality I can possibly make, without having to rush at the last minute or leave unfinished because I didn't give myself enough time to make mistakes and learn the best methods, techniques and the general usage of the software.
My final decision to make is to either create a full suit or just a bust of the suit as both will be challenging for me. The bust would give me more time to make mistakes, research and learn better or different techniques with the software. However I may have enough time to create the full suit as I could potentially pick up and understand the software and techniques quite well, due to past knowledge with Max. The only other option is to start with the bust of the suit and if I believe I have under scoped or have more time once the bust is complete to then add to the bust and create the full suit. I will be discussing this further with my tutors and researching into this idea in more depth to fully understand what I plan on undertaking over the next year.
Examples of Iron Man Models and Busts:


.jpgb289e167-49fc-40fa-89e3-290b0dfeb1fbLarge.jpg)

Bibliography:
Full Suits:
http://www.deviantart.com/morelikethis/311902929#
http://blueslogo.wordpress.com/2010/11/08/3d-ironman-model/
http://blueslogo.files.wordpress.com/2010/11/3d-ironman.png
http://www.turbosquid.com/3d-models/3d-model-of-ironman-mark2-mark3/643578
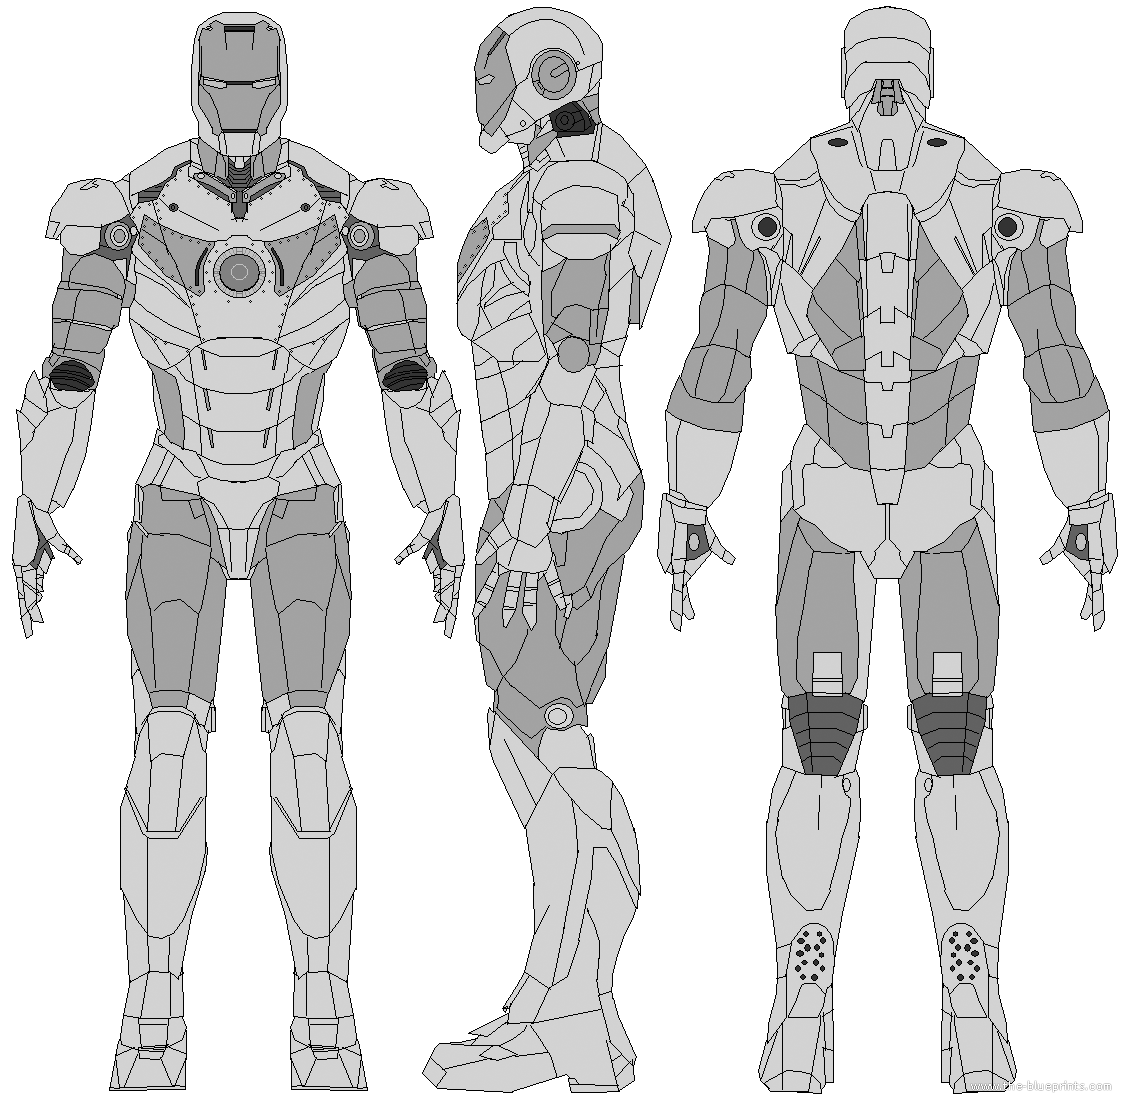
http://www.blueprintshut.com/25th-2011-cool-do-you-can-t-make-any-comments-because-are-not-/the-blueprints.com*blueprints-depot*humans*humans*ironman-mark-2.png/
Busts:
http://grabcad.com/library/iron-man-mark-2-bust
http://hypebeast.com/2013/3/hot-toys-iron-man-3-iron-patriot-collectible-bust
http://hypebeast.com/2013/1/hot-toys-iron-man-3-mark-xlii-collectible-bust
http://www.xavierpop.com/2013/02/28/10-new-images-for-iron-man-3/
http://www.angolz.com/store/iron-man-mark-vii-1-4th-scale-collectible-bust-iron-man-3-hot-toys-htb13.html
I quickly came to the conclusion that I want to pursue a career in the 3D modelling industry whether that be for games, films or TV. From this I then had to decide what I wanted to do and what could be done in the time frame given as well as challenge me.
My initial idea was to model a high quality version of my car and fully texture and animate it to make it look like my car was driving down a road and perhaps transforming into another vehicle or a transformers style robot, if I had time to do so. This would be very challenging for me as just the model alone would take up a lot if not all of my time frame let alone the texturing, rigging and animating side of the project. This idea was scrapped after talking with fellow students on my course as the time frame and lack of knowledge in rigging and animating would make this too difficult for me to learn and produce a high quality end result in the given time.
As many of you may know reading this, I am a big fan of the Marvel Comics Company and particularly the character Iron Man as I have included Marvel or Iron Man in some of my work over the last two years. So I thought I would carry on the tradition and try to incorporate one of them into my third year. I decided in the end to use Iron Man again as this would be a challenging model for me to complete.
My initial idea with Iron Man was to model, texture, rig and animate, similar to the above with my car idea, a full suit if the characters armour. But after discussing with my tutors and with some research into the time frame and difficulty of modelling something like this with so much detail and depth whilst taking into account the geometry for the characters movement, I decided to only model the full suit or bust. If I was working in the industry the modelling, rigging, texturing and animating would be done by different people or teams and I was encouraged to focus on one of them and not all as this would be more beneficial for me as it is better to be very good at one aspect instead of OK at many different parts of the creation process. As I am working on my own and not in a team it will still challenge my abilities and teach me new techniques and skills in the process whilst being relevant and demanding a lot of time and research.
Research:
I briefly looked into examples of previous Iron Man models and the time, patience and ability needed to create a high quality end product. As well as looking at the above and example tutorials on the internet on creating a Iron Man model I will also be researching how to create tidy geometry in my models as well as experimenting on different methods/techniques of creating the model and different software and what the software can and can't do. I will also be delving into how to create models to be ready to handed over to animation/rigging teams and how to have my model ready to go, for example taking into account the characters movement i.e. moving arms and legs whilst keeping the geometry tidy and free from deformations and warping.
Software and learning outcomes:
The software I was initially planning to use was Autodesk 3D Studio Max as I already have some knowledge on this software and how to use it. This software is also very highly used in most industries, whether that be games, film, TV, etc. so it will be great to show to potential, future employers what I can create using this software and I will be learning/trying out different techniques to see what style suits me best and I can work well with and apply to some, if not all, of my model as well as give myself greater knowledge of Max and a challenge in the creation process.
Again, after discussing with my tutors I was advised to research into using the MudBox software as, again, this is highly used in the industry, can do things easier/better than Max can, will be great to show to future employers and will broaden my knowledge with different software.
The model will be created initially in Max then imported into MudBox to add further details and sculpt the model until I am happy with the final result. This will also be challenging and developing my skills as I have yet to use MudBox but having knowledge in using more than one 3D modelling software is not going to be any disadvantage to me in the future. I will ensure that I have given my self enough time in the allotted time frame given to develop, learn and make mistakes using Max and MudBox as these, I believe are key pieces of software to learn how to use properly and I want my end result to be the highest quality I can possibly make, without having to rush at the last minute or leave unfinished because I didn't give myself enough time to make mistakes and learn the best methods, techniques and the general usage of the software.
My final decision to make is to either create a full suit or just a bust of the suit as both will be challenging for me. The bust would give me more time to make mistakes, research and learn better or different techniques with the software. However I may have enough time to create the full suit as I could potentially pick up and understand the software and techniques quite well, due to past knowledge with Max. The only other option is to start with the bust of the suit and if I believe I have under scoped or have more time once the bust is complete to then add to the bust and create the full suit. I will be discussing this further with my tutors and researching into this idea in more depth to fully understand what I plan on undertaking over the next year.
Examples of Iron Man Models and Busts:


.jpgb289e167-49fc-40fa-89e3-290b0dfeb1fbLarge.jpg)
Full Suits:
http://www.deviantart.com/morelikethis/311902929#
http://blueslogo.wordpress.com/2010/11/08/3d-ironman-model/
http://blueslogo.files.wordpress.com/2010/11/3d-ironman.png
http://www.turbosquid.com/3d-models/3d-model-of-ironman-mark2-mark3/643578
http://www.blueprintshut.com/25th-2011-cool-do-you-can-t-make-any-comments-because-are-not-/the-blueprints.com*blueprints-depot*humans*humans*ironman-mark-2.png/
Busts:
http://grabcad.com/library/iron-man-mark-2-bust
http://hypebeast.com/2013/3/hot-toys-iron-man-3-iron-patriot-collectible-bust
http://hypebeast.com/2013/1/hot-toys-iron-man-3-mark-xlii-collectible-bust
http://www.xavierpop.com/2013/02/28/10-new-images-for-iron-man-3/
http://www.angolz.com/store/iron-man-mark-vii-1-4th-scale-collectible-bust-iron-man-3-hot-toys-htb13.html
Subscribe to:
Comments (Atom)